Dark Side of the Moon in SwiftUI
Being a big Pink Floyd fan, I recently requested my wife, a budding painter, to paint the cover art for the band’s most successful album - The Dark Side of the Moon. Here’s what she came up with:
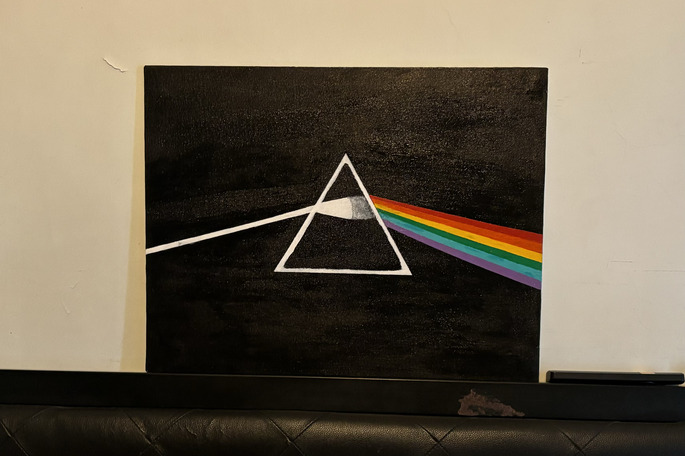
Inspired by her attempt at the painting, I too decided to try my hands at recreating it. Not a painter by any stretch of imagination, my tool of choice for this task is going to be SwiftUI.
Here’s what the “interactive” version of the cover art looks like:
This post describes how I went about creating this cover art in SwiftUI.
Analyzing the cover art
The image contains five main elements -
- An prism placed in the center of the image.
- A beam of light coming in from the left edge of the image, hitting the prism’s left edge.
- The dispersion of this beam of light inside the prism.
- The rainbow - an array of coloured beams of light going from right edge of prism to right edge of image.
- The black background.
Before we start drawing things on screen, we need to know the exact parameters that govern the position of these elements. Here’s an image showing these parameters -
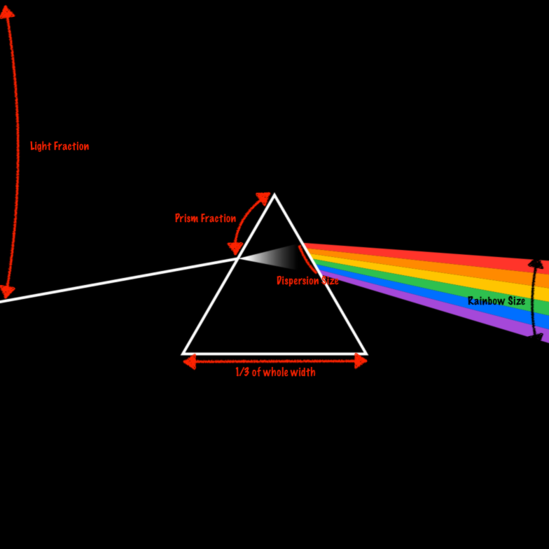
What each of the parameters mean -
Light Fractionis fraction of view height at which the beam of white light starts.Prism Fractionis fraction of prism’s left edge at which the beam of white light strikes the prism. By induction, it is also the point at which the dispersion starts.Dispersion Sizeis the fractional size of the dispersion on prism’s right edge. It’s center is at same fraction asPrism Fraction, but on prism’s right edge. By induction, it is also the fractional size of the rainbow on prism edge.Rainbow Sizeis the fractional size of the rainbow on the right edge. It’s center is at same fraction asLight Fraction, but on right edge of the view.
All these values are fractions between 0 and 1. All fractions are with respect to topmost points of their respective edges. So a Prism Fraction of 0.3 means - starting from top point of prism, move 0.3 * edge length units along the edge to get to the desired point. We will use these fractions to get the exact co-ordinates on screen once we know the dimensions of our view.
Let’s define a simple struct that holds all these fractions. I have tried to use values that most closely match the original cover art, though there might be slight imperfections.
struct Params {
    var lightFraction = 0.55
    var prismFraction = 0.4
    var dispersionSize = 0.2
    var rainbowSize = 0.15
}
Setting things up in code
For custom drawings like this one, SwiftUI provides a Shape protocol, whose only requirement is func path(in rect: CGRect) -> Path. Path is a struct used to trace the 2D outline of the Shape.
For a quick refresher on Shapes and Paths, I recommend checking out this article.
For this cover art, we will use nine shapes - one for prism, one for the beam of white light, one for dispersion and six shapes of same type for the colored array of lights. All these shapes will be encapsulated inside a View.
Let’s focus on the encapsulating view first. Since we are going to be positioning things based on absolute co-ordinates derived from Params fractions, it’s a good idea to start with GeometryReader. Cover arts are usually square and this one has a black background.
struct DarkSideView: View {
    let params: Params

    var body: some View {
        GeometryReader { proxy in
            // Draw stuff here
        }
        .aspectRatio(1, contentMode: .fit)
        .background {
            Color.black
        }
    }
}
Drawing the prism
Next up, let’s turn our attention to the prism. Since rest of the elements are going to depend on the size and position of the prism, let’s create a new struct to hold the co-ordinates of the prism’s points. We pass the size from our GeometryReader’s proxy to this struct. Based on this size, we can calculate the position of the three points of the equilateral triangle representing our prism.
private struct PrismPoints {
    let bottomLeft, bottomRight, top: CGPoint

    init(_ size: CGSize) {
        let prismSideLength = size.width / 3
        let prismHeight = prismSideLength * sin(Double.pi / 3)
        let prismBottomY = (size.height + prismHeight) / 2
        self.bottomLeft = CGPoint(x: prismSideLength, y:  prismBottomY)
        self.bottomRight = CGPoint(x: 2 * prismSideLength, y: prismBottomY)
        self.top = CGPoint(x: size.width / 2, y: prismBottomY - prismHeight)
    }
}- The length of each side -
prismSideLength- is 1/3rd the total available width of DarkSideView (note that width and height will be same since DarkSideView has a square aspect ratio.) - The height of the prism is
sin(π/3) * prismSideLengthsince that’s what the height of an equitateral triangle is. - Given height and side length - and assuming center of prism overlaps the center of the view - we can calculate the positions of all three points of the prism.
Let’s define a shape for the prism and use these prism points to trace out the shape.
private struct Prism: Shape {
    let prism: PrismPoints

    func path(in rect: CGRect) -> Path {
        Path { path in
            path.move(to: prism.bottomLeft)
            path.addLine(to: prism.bottomRight)
            path.addLine(to: prism.top)
            path.closeSubpath()
        }
    }
}

struct DarkSideView: View {
    let params: Params

    var body: some View {
        GeometryReader { proxy in
            let prism = PrismPoints(proxy.size)
            Prism(prism: prism)
                .stroke(Color.white, lineWidth: 2)
        }
        .aspectRatio(1, contentMode: .fit)
        .background {
            Color.black
        }
    }
}
Preview (tap to view)

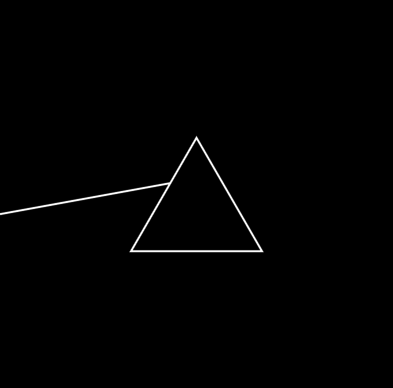
Drawing the beam of white light
The next shape to draw is the beam of white light from left edge of the view and hitting the left side of prism. This is a straight line whose start point is easy to calculate - it’s simply (0, viewHeight * lightFraction). The end point is not so simple. We have defined it as lying at prismFraction on the left side of the prism, starting from prism’s top point.
What we need is a way to calculate the co-ordinates of a point lying at any fraction between two given points - start and end.
private func point(atFraction fraction: Double, start: CGPoint, end: CGPoint) -> CGPoint {
    let x = (end.x - start.x) * fraction + start.x
    let y = (end.y - start.y) * fraction + start.y
    return CGPoint(x: x, y: y)
}- We calculate the x and y co-ordinates of resulting point separately using the x and y co-ordinates of start and end points.
- Note that the order of start and end points matters here.
With this function in place, we can now draw the beam of light easily.
private struct WhiteLight: Shape {
    let prism: PrismPoints
    let params: Params

    func path(in rect: CGRect) -> Path {
        Path { path in
            let lightStart = CGPoint(x: .zero, y: rect.height * params.lightFraction)
            let lightEnd = point(atFraction: params.prismFraction, start: prism.top, end: prism.bottomLeft)

            path.move(to: lightStart)
            path.addLine(to: lightEnd)
        }
    }
}

struct DarkSideView: View {
    let params: Params

    var body: some View {
        GeometryReader { proxy in
            let prism = PrismPoints(proxy.size)
            WhiteLight(prism: prism, params: params)
                .stroke(Color.white, lineWidth: 2)
            Prism(prism: prism)
                .stroke(Color.white, lineWidth: 2)
        }
        .aspectRatio(1, contentMode: .fit)
        .background {
            Color.black
        }
    }
}
Preview (tap to view)
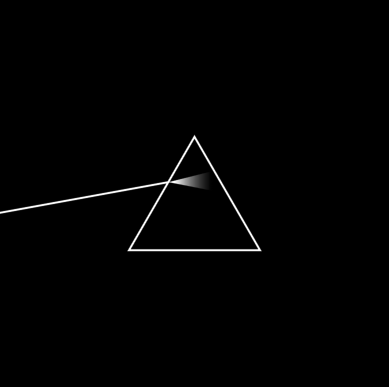
Drawing the dispersion
Dispersion is a smaller triangle within the main prism. We need to know the co-ordinates of the three points that define this triangle - left, topRight and bottomRight. Left point is same as the point where the white light hits the prism. For top right point and bottom right points, we first need to find the respective fractions of prism’s right side. For top right, the fraction is prismFraction - dispersionSize / 2 and for bottom right it is prismFraction + dispersionSize / 2. This puts the center of dispersion at same position on right edge as where the light hits prism’s left edge.
We fill this shape with a linear gradient going from white to black. The start and end points for the gradient are chosen after a bit of trial and error since calculating them is not very easy.
private struct Dispersion: Shape {
    let prism: PrismPoints
    let params: Params

    func path(in rect: CGRect) -> Path {
        Path { path in
            let left = point(atFraction: params.prismFraction, start: prism.top, end: prism.bottomLeft)
            let topRight = point(atFraction: params.prismFraction - params.dispersionSize / 2,
                                 start: prism.top, end: prism.bottomRight)
            let bottomRight = point(atFraction: params.prismFraction + params.dispersionSize / 2,
                                    start: prism.top, end: prism.bottomRight)

            path.move(to: left)
            path.addLine(to: topRight)
            path.addLine(to: bottomRight)
            path.closeSubpath()
        }
    }
}

struct DarkSideView: View {
    let params: Params

    var body: some View {
        GeometryReader { proxy in
            let prism = PrismPoints(proxy.size)
            WhiteLight(prism: prism, params: params)
                .stroke(Color.white, lineWidth: 2)
            Dispersion(prism: prism, params: params)
                .fill(.linearGradient(colors: [.white, .black],
                                      startPoint: UnitPoint(x: 0.45, y: 0.5),
                                      endPoint: UnitPoint(x: 0.55, y: 0.5)))
            Prism(prism: prism)
                .stroke(Color.white, lineWidth: 2)
        }
        .aspectRatio(1, contentMode: .fit)
        .background {
            Color.black
        }
    }
}
Preview (tap to view)
Drawing the rainbow
The rainbow emanating from the right side of the prism is actually six different shapes, each being a quadrilateral with two points on the prism and two points on right edge of the view. First, we need the start and end points for the whole rainbow on both sides. The points on the prism edge are exactly the same as the ones for dispersion. That is - the points at fractions prismFraction - dispersionSize / 2 and prismFraction + dispersionSize / 2.
For the right edge points, we use a similar approach. The co-ordinates of these points will lie at fractions lightFraction - rainbowSize / 2 and lightFraction + rainbowSize / 2 of the right edge of the view.
Once, we have the co-ordinates of the whole rainbow shape, we can dice things up in slices of six to get the co-ordinates of individual quadrilaterals. The quadritaterals are then filled with proper colors to get the pretty rainbow 🌈.
private struct RainbowSlice: Shape {
    let prism: PrismPoints
    let params: Params
    let index: Int
    let colorCount: Int

    func path(in rect: CGRect) -> Path {
        Path { path in
            let leftFractionStart = params.prismFraction - params.dispersionSize / 2
            let leftFractionStep = params.dispersionSize / Double(self.colorCount)
            let topLeftFraction = leftFractionStart + (Double(index) * leftFractionStep)
            let bottomLeftFraction = topLeftFraction + leftFractionStep

            let rightFractionStart = params.lightFraction - params.rainbowSize / 2
            let rightFractionStep = params.rainbowSize / Double(self.colorCount)
            let topRightFraction = rightFractionStart + (Double(index) * rightFractionStep)
            let bottomRightFraction = topRightFraction + rightFractionStep

            let topLeft = point(atFraction: topLeftFraction, start: prism.top, end: prism.bottomRight)
            let topRight = CGPoint(x: rect.maxX, y: rect.maxY * topRightFraction)
            let bottomRight = CGPoint(x: rect.maxX, y: rect.maxY * bottomRightFraction)
            let bottomLeft = point(atFraction: bottomLeftFraction, start: prism.top,  end: prism.bottomRight)

            path.move(to: topLeft)
            path.addLine(to: topRight)
            path.addLine(to: bottomRight)
            path.addLine(to: bottomLeft)
            path.closeSubpath()
        }
    }
}

struct DarkSideView: View {
    private static let colors: [Color] = [.red, .orange, .yellow, .green, .blue, .purple]
    let params: Params

    var body: some View {
        GeometryReader { proxy in
            let prism = PrismPoints(proxy.size)
            WhiteLight(prism: prism, params: params)
                .stroke(Color.white, lineWidth: 2)
            Dispersion(prism: prism, params: params)
                .fill(.linearGradient(colors: [.white, .black],
                                      startPoint: UnitPoint(x: 0.45, y: 0.5),
                                      endPoint: UnitPoint(x: 0.55, y: 0.5)))
            ForEach(0..<Self.colors.count, id: \.self) { index in
                RainbowSlice(prism: prism,
                             params: params,
                             index: index,
                             colorCount: Self.colors.count)
                .fill(Self.colors[index % Self.colors.count])
            }
            Prism(prism: prism)
                .stroke(Color.white, lineWidth: 2)
        }
        .aspectRatio(1, contentMode: .fit)
        .background {
            Color.black
        }
    }
}
Preview (tap to view)

Finishing touches
At this point, we have a fairly good looking rendition of the original cover art. We can make the whole thing interactive by simply making the Params struct a @State and adding sliders for modifying each of it’s values.
A bit more complex addition is to animate the drawing of the cover art so that the prism outline is traced out first, followed by the beam emanating from the left, hitting the prism and getting dispersed as the rainbow. To achieve this, we need to modify the shape drawing code to support partially completed paths. You can find the full code for this experiment in the corresponding Github repo.